Introduction
Artificial Intelligence (AI) is changing the way we interact with technology, and emotion detection is one of the most exciting applications of AI. It allows computers to understand human emotions based on text, voice, or even facial expressions.
In this article, you’ll learn how to build a text-based emotion detection app in Python using Natural Language Processing (NLP) and a pre-trained machine learning model. We’ll also give it a simple graphical user interface (GUI) using Tkinter, so users can easily input text and get real-time feedback on the emotions in their messages.
This project is perfect for beginners and learners who are looking to combine machine learning with a user-friendly interface.
What You’ll Learn
- How to use Hugging Face’s Transformers to load pre-trained emotion detection models.
- How to integrate emotion detection into a Python program.
- How to create a simple GUI using Tkinter.
- How to run and test the application.
Prerequisites
Before you get started, make sure you have:
- Basic knowledge of Python (variables, functions, etc.).
- Python 3.x installed on your system.
- An interest in exploring Natural Language Processing (NLP) and graphical user interface (GUI) development.
Step 1: Setting Up the Environment
First, let’s set up the necessary tools for our project.
Installing Required Libraries
We’ll be using the Transformers library from Hugging Face to detect emotions from text, and Tkinter to build the GUI. Install these libraries by running the following commands
pip install transformers torch
pip install tk
The Transformers library allows us to easily load and use pre-trained models for NLP tasks, while Tkinter is Python’s built-in GUI toolkit.
Step 2: Loading the Pre-Trained Emotion Detection Model
Instead of training a model from scratch, we can leverage a pre-trained model for emotion detection. Hugging Face offers a wide range of pre-trained models, including the one we’ll use for detecting emotions.
Here’s how you load the model:
from transformers import pipeline

# Load the pre-trained emotion detection model
emotion_classifier = pipeline('text-classification', model='j-hartmann/emotion-english-distilroberta-base')

def detect_emotion(text):
    result = emotion_classifier(text)
    label = result[0]['label']
    score = result[0]['score']
    return f"Emotion: {label}, Confidence: {score:.2f}"
In this code, we use Hugging Face’s pipeline() function to load the emotion detection model. The detect_emotion() function takes user input (text), runs it through the model, and returns the predicted emotion and confidence score.
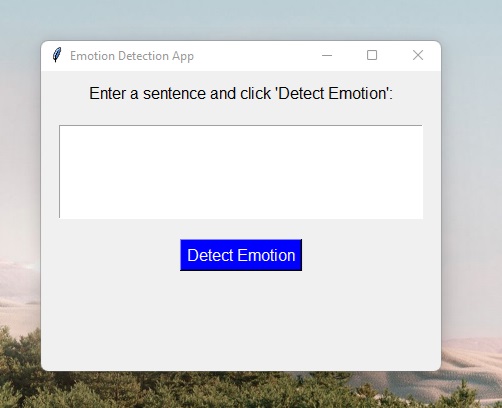
Step 3: Building the GUI with Tkinter
Now, let’s add a graphical user interface to make the app interactive. Tkinter is a lightweight toolkit for creating desktop apps in Python. Here’s how we can integrate Tkinter with our emotion detection function.
Creating a Simple UI
We’ll create a simple window where users can input text, click a button, and see the detected emotion.
import tkinter as tk
from tkinter import messagebox
from transformers import pipeline

# Load the emotion detection model
emotion_classifier = pipeline('text-classification', model='j-hartmann/emotion-english-distilroberta-base')

# Function to detect emotion from input text
def detect_emotion(text):
    result = emotion_classifier(text)
    label = result[0]['label']
    score = result[0]['score']
    return f"Emotion: {label}, Confidence: {score:.2f}"

# Function to get text and display emotion
def get_emotion():
    text = input_text.get("1.0", "end-1c")
    if text.strip() == "":
        messagebox.showwarning("Input Error", "Please enter some text!")
        return
    emotion_result = detect_emotion(text)
    result_label.config(text=emotion_result)

# Create the main application window
app = tk.Tk()
app.title("Emotion Detection App")
app.geometry("400x300")

# Create a label for instructions
instruction_label = tk.Label(app, text="Enter a sentence and click 'Detect Emotion':", font=("Arial", 12))
instruction_label.pack(pady=10)

# Create a Text widget for user input
input_text = tk.Text(app, height=5, width=40, font=("Arial", 12))
input_text.pack(pady=10)

# Create a button to trigger emotion detection
detect_button = tk.Button(app, text="Detect Emotion", command=get_emotion, font=("Arial", 12), bg="blue", fg="white")
detect_button.pack(pady=10)

# Create a label to display the emotion result
result_label = tk.Label(app, text="", font=("Arial", 12), fg="green")
result_label.pack(pady=10)

# Start the Tkinter event loop
app.mainloop()
Understanding the GUI Code:
- We created a main application window using Tkinter.
- Users can enter a sentence in the Text widget.
- When the “Detect Emotion” button is clicked, the app triggers the
get_emotion()function, which runs the input through our emotion detection model. - The detected emotion and confidence score are displayed below the button in a Label.
Step 4: Running the App
Save the script and run it using:
python emotion_detection_gui.py
A window will appear where you can enter text, click the button, and see the detected emotion. Try entering sentences like:
- “I’m so happy to learn this!”
- “I’m frustrated with this error.”
The app will display the corresponding emotions along with the confidence score.
Step 5: Enhancements
You can further improve the app by:
- Adding more languages: Use different pre-trained models for multiple languages.
- Voice input: Add speech recognition to detect emotions from spoken words.
- Custom emotion datasets: Fine-tune your own emotion detection model for specific tasks like customer sentiment analysis.
Conclusion
You’ve just built a simple emotion detection app with Python using NLP and a GUI. This project is a great introduction to combining machine learning models with user-friendly applications. Whether you’re a student, a data science enthusiast, or just getting started with AI, this is an excellent way to get hands-on experience with real-world applications of NLP.